


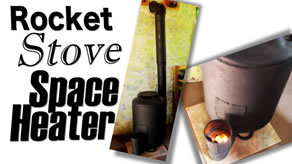
 Rocket Stove Space Heater
We want to thank our neighbor, Vicky, for introducing us to rocket stoves. We quickly got busy searching the internet for stove ideas. Looking for an excuse to build one of our own, we considered the effectiveness of the radiant heat floor in the Earthbag Structure. This setup uses propane. Propane is getting very expensive. A rocket stove to heat water is a better idea but in the meantime, we decided on a smaller, more fun project to propel us into the “rocket” adventure.
Space Heater
Something more portable and unobtrusive seemed more appropriate for our needs. Why not scale down the big designs we were seeing on the internet and make something to fit a small room.
We started the design for our space heater. Three main parts were needed: a firebox, combustion chamber and exhaust. We like the simple. It was time to locate resources.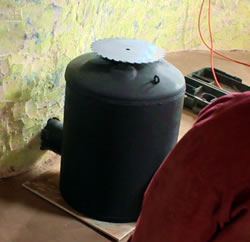
Living on a homestead has its advantages when it comes to finding parts for projects. When we need something, it seems to “magically appear” in our metal recycle pile.
Firebox
We started by building a firebox from 4.5 inch steel pipe. A simple “J” shape would do. We cut the pipe at 45-degree angles and welded the pieces together at right angles. The cool thing about the “J” shape design is that the fire will burn sideways from a draft caused by the exhaust. It was a little tricky welding the pieces together in a small application. We could not finish the firebox until some of the combustion chamber was completed. They needed to work together hand in hand. We love a challenge.
Combustion Chamber
This part of the project required an insulated internal section and cover to complete a chamber. We  used a steel 5-gallon can to insulate the long exhaust section of the “J” shape. After completing the weld of the “J” shape firebox, we filled the bucket with ash for insulation and covered it with a cut out section of an old appliance from the “Magical Metal Pile”. Some of the videos from the internet showed builders using cob and perlite.
The second section of the combustion chamber is a cover that can take some heat. Because the rocket effect of the fire exhaust out of the top of the firebox is so hot, we used an old water heater section for the outside casing of the chamber.
The Exhaust
Our research indicated that the exhaust was to be mainly steam, CO2 and a little smoke. Our designed then was to vent out the back of the chamber casing straight to the outside withno venting upwards. Little did we know…. All these pieces were assembled with the idea of making it compact and useful for heating a small room. The firebox was designed to enter horizontal into the side of the outer casing of the chamber to give it a low profile. The height of the unit was to be about 2 feet. It was only 16 inches in diameter to fit in a small space. It vented straight out the back.
Install
We tested the unit outside. It had some problems with draft but when the wind kicked up; it would back flow and reverse the burn direction. We were not too concerned, thinking that the outdoor conditions with wind was skewing our effectiveness. No worries.
We added a 10 inch saw blade to the top of the unit. It rather looked like a crown. We gleefully carried our creation to its rightful tile throne, precisely placed to raise the stove off the common cob floor. We carefully cut a hole in the lower section of the super adobe wall and placed the horizontal exhaust pipe through its ordained gapping orifice. We anxious lit a small fire in the firebox expecting to feel the warming heat from the rocket stove combustion chamber. What a moment….
Round One
The first round did not go well at all. Smoke backed up in the room making it impossible to stay inside. We extinguished the small fire and dissembled the rocket stove from the wall. We were surprised. We carried our kingly creation back to the drawing board and began to debrief the problems.
Redesign
What went wrong? We thought we followed the internet examples very carefully. Sure, we added some of our design elements but what did we leave out or miss?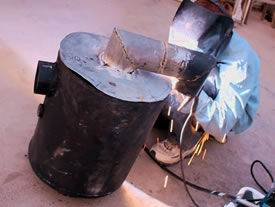
Here it is. We pulled the stove apart and examined the design. We discovered we built the firebox higher than the exhaust so we did not start the draft process properly. In addition, we think that the draft would work better if the exhaust was longer and mostly pointing up. Warm air raises thus, more draft. The exhaust was too short which caused air to blow back into the stove instead of exiting out.
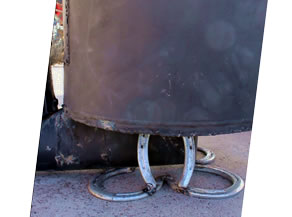 We redesigned the firebox to enter from underneath. As a backup thought process, If thought we needed a Round Three, we would increase the size of the firebox to 6” diameter. We extended the exhaust from the 3-foot length to 15 feet including a couple small turns by adding “duct” piping we purchased at the local hardware store. We made the changes and added a cool horseshoe base to stand the stove. We replaced the ash insulation with lava rock. In addition, we made a higher hole in the Super Adobe wall to fit the new exhaust pipe.
As before, we made the majestic march to the thematic throne. We gave fire to the firebox and stood back.
Round Two
Round two was much better. The stove is now doing what it is supposed to do - heating the room. The redesign was successful. Yea!!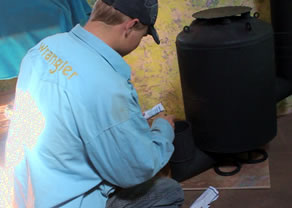
Unfortunately, we had already punched a hole through the lower earth bag wall. The mistaken hole was simply filled with cob and repainted. It gave the gals an opportunity to jump in and help with this typical “man” project.
Next Up
What’s next? We are antsy to start another Rocket Stove project. Well, actually, we have already started on one. It’s a bench rocket stove for our dining room. (Link Coming Soon!)
Gary
March 10, 2013
Partners
Resources
www.greenhomebuilding.com/adobe.htm
www.earthbagbuilding.com/articles.htm
www.earthbagplans.wordpress.com
We moved from the city to the country in 2005. Since then, we have been building structures, raising livestock and growing some of our own foods. We are crazy about family, nutrition and want the best for our growing family.
![]()