


Soil Cement and Radiant Floor
Great Neighbors
Vicky, our neighbor, gave us some new information to complete our floor in the super adobe structure. We are working with soil cement and radiant heat flooring.
Soil Cement
We have covered our patio construction using soil cement in another video. (See Soil Cement Patio). Here we have the same application of soil cement but we have added the installation of a radiant heat floor.
Radiant Heat Flooring
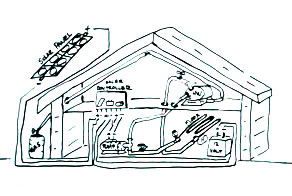
We used the following materials with our installation:
- 5/8 inch PEX 02 Tubing
- 5/8 inch PEX connectors to the inlet and outlet water connections
- 5 Gallon Propane RV water heater
- DC water pump for circulation
- 12 volt deep cell battery
- 12 volt heating thermosta
- 12 volt solar panel
- 12 volt solar controller
- 5/8 check valve
Soil Cement Floor
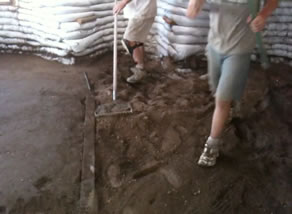
We made careful plans to lay the PEX tubing in a serpentine weave with a 2 foot separation. After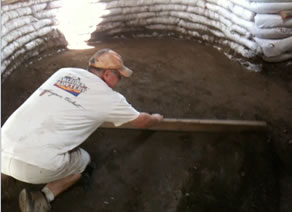 making a
 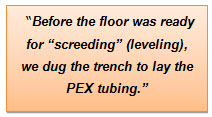 dry fit of the tubing, we began the soil cement floor. Before the floor was ready for “screeding” (leveling), we dug the trench to lay the PEX tubing. We covered our trenches, leveled and tamped. It was important to make sure we could lay the PEX back down in the trenches before the soil cement floor began to cure. We kept the floor damp for several days. The work was completed very quickly.
Water Heater Connections
After the PEX was laid in place and soil
cement sub-floor installed, we began the connection of the RV water heater.
The heater was found on Craig’s List from a person parting out an older RV. It was in good shape. With an aluminum tank, the heating system was set up for propane. This was perfect for our application.
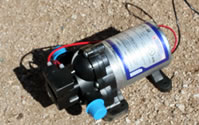 Pump Connections
We purchased a Shurflo RV DC pump online. There are several choices. We went with the style that was either on or off. Since the water flow system is designed to be closed, there was no need for a demand pump with water pressure switch system. We used stainless connections from the PEX fittings to the DC pump.
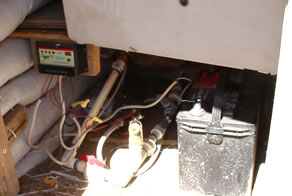 Temperature Switch
After a trip to the local hardware store, we located a DC thermostat. There are several kinds to choose from. We choose the 12-24 DC Volt type. The simple floating bar and temperature gauged spiral type. We ran the wiring to the solar system electrical system.
Solar System
We had purchased several 40 watt solar panels for other solar projects around the homestead. We modeled this application after the successful solar system we installed for the demand pump on the well tank for water to the homestead. (See the video Solar Water System Installation https://www.youtube.com/watch?v=eexSaZs4sos for additional information on the specific connections.
Suffice it to say, we used 2 each - 40 watt panels to charge a 12 volt deep cell marine battery. We ran wiring connections through a solar controller. The only exception to the Water tank application was the addition of a ambient temperature switch (thermostat). We wired this inline from the pump to the battery. No juice to the pump until the thermostat kicked in.
Complications
The biggest challenge to this project was bleeding the air from the closed water system. We had to install shut off valves and 2 water hose bibs. We pressurized the system with water from the house and opened the upper valve located at the water tank (located highest in the configuration). Our problem was compounded when we looked under the water tanks metal covering to find the upper outflow connection was set lower to the side of the tank. This caused a cavity of air to stay at the top of the tank. With enough “rocking and swishing” we moved the tank enough to expel the captured air. Also, we had to devise a way to keep the pilot light on with the hot water tank. The wind kept blowing it out and we lost some fuel, albeit very little. With the problems fixed, we were ready to fire it up!
Successful Completion
We tested the pump, hot water tank and water flow through the pump and floor separately at each stage of the installation. Things were working as expected. It was time to test the complete radiant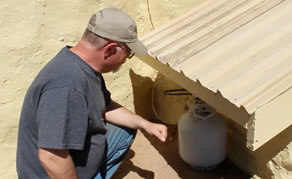 floor project. We used a 5 gallon propane tank for the fuel supply to the Water heater. The cost at the time was near $2.50 per gallon. After running the system for several hours, heat was beginning to radiate from the floor. This was a great project and warm too.
To Top it Off
We put a 3/4 inch Earthen Floor layer on the top of this sub floor (see Earthen Floor Installation)
to finish it.
Gary
January 4, 2013
Partners
Resources
www.greenhomebuilding.com/adobe.htm
www.earthbagbuilding.com/articles.htm
www.earthbagplans.wordpress.com
We moved from the city to the country in 2005. Since then, we have been building structures, raising livestock and growing some of our own foods. We are crazy about family, nutrition and want the best for our growing family.
![]()