


Earthen Floor Installation
Prep Work
Installing a floor covering in any application requires a firm sub-floor. In previous videos, we demonstrated how we made soil cement and installed the radiant heat tubing (see Soil Cement & Radiant Floor). Our earthen floor is the last step in completing this project.
Materials Needed
Here is a list of things we used to make this beautiful floor:
3 parts sand
1 part clay
½ part straw
Water
We saved the earthen/cob floor installation until last because it requires some careful timing to cure completely. You will see why in a minute..

Mixing
Garen volunteered to apply the cob. Nobody objected. This task requires someone to hand trowel a heavy mud to the floor while on your hands and knees. Concrete flat work contractors can relate - tough on the knees and an upper body workout. Oh well, Garen can always find an excuse to get bigger muscles.
We mixed the above ingredients dry, then applied the water. We wanted a mixture consistancy equal to something like a soft peanut butter. Wet but not soupy.
Troweling
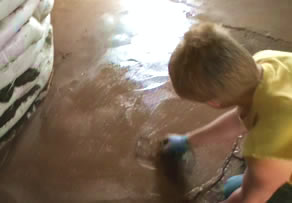 Working his way to the door, he dropped the cob to the floor then troweled it to about ¾ of an inch in thickness. He used a wooden 16 inch beveled trowel. It took Garen less than a day to apply the cob floor. It took longer to gather and mix the materials.
Hardening the Floor
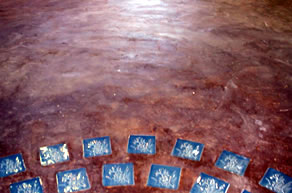
Here in the SW it took about a week to cure the floor completely. This is a dirt floor and subject to water damage and denting. To prevent any severe problems, we learned from the internet to apply boiled linseed oil. It took 5 coats to apply before the floor hardened to our satisfaction.
Gary
January 10, 2013
Partners
Resources
www.greenhomebuilding.com/adobe.htm
www.earthbagbuilding.com/articles.htm
www.earthbagplans.wordpress.com
We moved from the city to the country in 2005. Since then, we have been building structures, raising livestock and growing some of our own foods. We are crazy about family, nutrition and want the best for our growing family.
![]()